tail -f -n 50 my_images.changes |tr "\r" "\n"
Showing posts with label pharo. Show all posts
Showing posts with label pharo. Show all posts
Thursday, August 1, 2013
Inspect Pharo changes file
Here's a little trick from Igor to format .changes files on a console:
Tuesday, July 12, 2011
TWM: Docking Windows
Using Pharo 1.4 and latest TWM packages, you can now group windows as tabs.
Use:
Use:
(ConfigurationOfTilingWindowManager project
version: #bleedingEdge) loadTuesday, June 28, 2011
My Pharo image
Backup of my preferences:
Gofer it
   squeaksource: 'MetacelloRepository';
   package: 'ConfigurationOfPhexample';
   package: 'ConfigurationOfAutotest';
   squeaksource: 'TilingWindowManager';
   package: 'ConfigurationOfTilingWindowManager';
   load.

(Smalltalk at:#ConfigurationOfTilingWindowManager) perform: #loadDevelopment.
(Smalltalk at:#ConfigurationOfPhexample) load.
((Smalltalk at:#ConfigurationOfAutotest) project version: #development) load: 'OB'.

(Smalltalk at:#TWMUITheme) beCurrent.
TaskbarMorph  showTaskbar: false.
TasklistMorph keepOpen: true.
(Smalltalk at:#TWMBar) perform: #showTWMBar: with: true.
(Smalltalk at: #AutotestDashboard) perform: #showAutotestDashboard: with: true.
Tuesday, June 7, 2011
Multiple Worlds for TWM
With the help of my local developper group, I've integrated Sean DeNigris work and now Tiling Window Manager supports Multiple Worlds.
Here's a screencast that shows the progress. (My English seems a little less catastrophic than the previous screencast :)
Note: The tests failing on the screencast (Pharo 1.2) are green on Pharo 1.3.
Load TWM with:
And ConfigurationOfKeyMapping 1.7 (TWM do not work with 1.8 actually) with:
Here's a screencast that shows the progress. (My English seems a little less catastrophic than the previous screencast :)
Note: The tests failing on the screencast (Pharo 1.2) are green on Pharo 1.3.
Load TWM with:
Gofer it
  squeaksource: 'TilingWindowManager';
  package: 'TWM';
  load.
And ConfigurationOfKeyMapping 1.7 (TWM do not work with 1.8 actually) with:
Gofer it
    squeaksource: 'ShortWays';
    package: 'ConfigurationOfKeymapping';
    load.

(ConfigurationOfKeymapping project version: '1.7') load.Saturday, May 28, 2011
Tiling Window Manager
I love Emacs because of editing speed and fast buffer switching among a lot neat features.
This week I've tried to make Pharo a little better on window management. This video shows the progress (thanks Gastón and Patrick for help and ideas).
Next step: KeyMapping integration + history à la Emacs winner-mode.
Sorry for my soooooooo awful english (tired ....).
Update 05/31/2011: you can load last version with colored theme with:
Tested on PharoCore 1.2 and Pharo 1.3.
Now this has support for world snapshot, that means you can arrange the windows and take a snapshot of the layout. Then you can restore these layouts later. (icons camera, <, > and trash). I'm not entirely satisfied with this, thanks for feedback.
In Pharo 1.3 there's initial integration with KeyMapping. To load:
Then in settings browser > Keymappings > Tiling Window Managers you have all actions of the dock mapped.
You can choose a Layout Strategy in settings.
Actually there's Horizontal (default) and Vertical (last used windows fills all remaining space) strategies.
To add your own just subclass TWMLayoutStrategy and implement #tileWindows:
To load TWM:
I also think the UI theme Patrick has cleaned fits better with TilingWM:
This week I've tried to make Pharo a little better on window management. This video shows the progress (thanks Gastón and Patrick for help and ideas).
Next step: KeyMapping integration + history à la Emacs winner-mode.
Sorry for my soooooooo awful english (tired ....).
Update 05/31/2011: you can load last version with colored theme with:
Gofer it
  squeaksource: 'TilingWindowManager';
  package: 'TWM';
  load.
(Smalltalk at: #StandardUITheme) beCurrent.
(Smalltalk at: #TWMBar) showTWMBar:true.
Tested on PharoCore 1.2 and Pharo 1.3.
Now this has support for world snapshot, that means you can arrange the windows and take a snapshot of the layout. Then you can restore these layouts later. (icons camera, <, > and trash). I'm not entirely satisfied with this, thanks for feedback.
In Pharo 1.3 there's initial integration with KeyMapping. To load:
Gofer it
  squeaksource: 'ShortWays';
  package: 'ConfigurationOfKeymapping';
  load.

(Smalltalk at: #ConfigurationOfKeymapping project version: '1.7') load.
Then in settings browser > Keymappings > Tiling Window Managers you have all actions of the dock mapped.
You can choose a Layout Strategy in settings.
Actually there's Horizontal (default) and Vertical (last used windows fills all remaining space) strategies.
To add your own just subclass TWMLayoutStrategy and implement #tileWindows:
To load TWM:
Gofer it
 squeaksource: 'TilingWindowManager';
 package: 'TWM';
 load.
I also think the UI theme Patrick has cleaned fits better with TilingWM:
Gofer it
 squeaksource: 'PBASandbox';
 package: 'PBSandbox';
 load.

StandardUITheme beCurrent.
Wednesday, April 13, 2011
Petite Horloge revisited
Another Pharo Smalltalk snippet with temp classes (I like this :)
Don't forget the setFormat: or the VM will crash.Some explanations.
(Class new
    superclass: StringMorph;
    setFormat: StringMorph format;
    compile: 'step self contents: Time now printString';
    new)
        openInWindowLabeled: 'Petite Horloge'.
Don't forget the setFormat: or the VM will crash.Some explanations.
Polymorph counter example
I've discovered that I can write this in Pharo:

Coooooooooooooool ;)
"This creates a class and one instance on the fly"
counter := Class new
              superclass: Object;
              addInstVarNamed: 'counter';
              compile: 'initialize
                           counter := 0';
              compile: 'counterString
                           ^ counter asString';
              compile: 'increment
                           counter := counter + 1.
                           self changed:#counterString';
              compile: 'decrement
                           counter := counter - 1.
                           self changed:#counterString';
              new.

(UITheme builder newColumn: {
  UITheme builder newLabelFor: counter getLabel: #counterString getEnabled: nil.
  UITheme builder newRow: {
    UITheme builder newButtonFor: counter action: #increment label: '+' help: nil.
    UITheme builder newButtonFor: counter action: #decrement label: '-' help: nil.
  }
}) openInWindowLabeled: 'Counter example'.
Coooooooooooooool ;)
Saturday, March 19, 2011
Multiple worlds for Pharo
Sean DeNigris submitted a changeset to get multiple worlds in Pharo.
I've played a little with it to get a world switcher. If you want it, first file in the changeset file (download it the drag the file on an opened image).
Then the following code add three worlds named 2,3,4 and create a dock in each world.
I've played a little with it to get a world switcher. If you want it, first file in the changeset file (download it the drag the file on an opened image).
Then the following code add three worlds named 2,3,4 and create a dock in each world.
|wm|
wm := WorldManager instance.
#('2' '3' '4') do: [:aString| wm createOrSwitchToWorldNamed: aString].

wm worlds keysAndValuesDo:  [:aWorldName :aWorld| |dock|
  dock := DockingBarMorph new
          adhereToTop;
          openInWorld: aWorld.

  wm worlds keysAndValuesDo: [:aWorldName2 :aWorld2|
    dock addMorph: (SimpleButtonMorph new
                    label: aWorldName2;
                    target: [wm createOrSwitchToWorldNamed: aWorldName2];
                    actionSelector: #value) ].

  dock addMorph: (StringMorph contents: aWorldName).
].
Monday, February 28, 2011
Work on Mocketry
Mocketry is a Mocketry is Smalltalk mock object framework.
To load it in Pharo:
I've done the first part of the Picasa screencast in a TDD way using Mocketry to prevent external HTTP requests.
As the requests are done using
In PicasaSearch:
See that mocketry extends BlockClosure to create mocks:
and set up expectations:
See HelpSystem book loaded with Mocketry for several examples.
Comments and better code propositions are welcome.
To load it in Pharo:
Gofer it
  squeaksource: 'MetacelloRepository';
  package: 'ConfigurationOfMocketry';
  load.

(Smalltalk at:#ConfigurationOfMocketry) project latestVersion load.
I've done the first part of the Picasa screencast in a TDD way using Mocketry to prevent external HTTP requests.
Gofer it
 squeaksource: 'LaurentLSandbox';
 package: 'Picasa';
 load.
As the requests are done using
HTTPSocket class>>httpGet:, one way is to give a mock to PicasaSearch so we can check (and stub) the HTTP request: PicasaSearchTwoRoughSeaTest>>setUp
[:mockHTTPSocketClass|
[photos := PicasaSearch new
httpSocketClass: mockHTTPSocketClass;
addKeyword: 'rough';
addKeyword: 'sea';
maxResult: 2;
photos.]
should strictly satisfy: [
(mockHTTPSocketClass httpGet:
'http://picasaweb.google.com/data/feed/api/all?q=rough+sea&max-results=2')
willReturn: self fixtureXMLResponseForTwoRoughSea]
] runScenario.
#fixtureXMLResponseForTwoRoughSea will return an XML string and test methods will check that it is correctly parsed.In PicasaSearch:
httpGetDocument
  |url|
  url := String streamContents: [:aStream|
  aStream
    nextPutAll: 'http://picasaweb.google.com/data/feed/api/all?q=';
    nextPutAll: ('+'  join: self keywords);
    nextPutAll: '&max-results=';
    nextPutAll: self maxResult asString.
  ].

  ^ (self httpSocketClass httpGet: url).
See that mocketry extends BlockClosure to create mocks:
[:myFirstMock :mySecondMock|
"do stuff with mocks"
] runScenario
and set up expectations:
[:myFirstMock :mySecondMock|
  [ "do stuff with mocks" ]
  should strictly satisfy:
  [ "what is expected on mocks" ]
] runScenario
See HelpSystem book loaded with Mocketry for several examples.
Comments and better code propositions are welcome.
Monday, February 21, 2011
XML Browser with Pharo
I've written a little tool to help me browse xml. If you want to try it:

See
Gofer new
 squeaksource: 'LaurentLSandbox';
 package: 'XML-GUI';
 load.

((Smalltalk at:#XMLBrowser) labelled: 'Picasa search')
  browseAtUrl:
   'http://picasaweb.google.com/data/feed/api/all?q=lighthouse&max-results=10'.

See
XMLBrowser comment for examples.
Tuesday, February 8, 2011
Smalltalk tiny exercise for TDD newbies
Done in course:
Create the category Exercise in the Browser. All classes you create will be placed in this category.
Implement the class Operation (using Test-Driven Development) which should work like this:
Add the message
Create the category Exercise in the Browser. All classes you create will be placed in this category.
Implement the class Operation (using Test-Driven Development) which should work like this:
a := Operation new.
a result.
b := Operation new.
b add: 2.
b add: 3.
b result.
Operation new
  add: 2;
  add: 4;
  divideBy: 2;
  result.
Add the message
Operation>>#multiplyBy by yourself.
Sunday, February 6, 2011
new funny ProfStef lesson
Update to last ProfStef (on Pharo 1.2 only):

Gofer it
 squeaksource: 'MetacelloRepository';
 package: 'ConfigurationOfProfStef';
 load.

ConfigurationOfProfStef project latestVersion load.

ProfStef
  go;
  tutorial: SmalltalkSyntaxTutorial lesson: #instanciation.
Friday, January 28, 2011
Tuesday, January 25, 2011
Pharo GUI with Polymorph
I've written a tiny address book to prepare a screencast on Polymorph basis. If you want to look at it:

Start by looking how the contact list is built:
When the Add button is clicked, message #addButtonClick is sent on the ContactListEditor object:
ContactEditor defines a modal dialog to edit the firstName and lastName of a Contact:
Disabling the acceptOnCR for each text frield allows the default dialog handling for the return key (defaults to OK).
Normally the initial keyboard focus for a dialog is the default button, if specified. Remembering the first name field prior to opening will give that field focus.
Now it should be easier to understand Polymorph examples found in
UITheme class>>exampleBasicControls and friends (in examples protocol).
Gofer it
 squeaksource: 'Pharocasts';
 package: 'ContactManager';
 load.

(Smalltalk at:#ContactListEditor) open.

Start by looking how the contact list is built:
ContactListEditor>>open
  |builder content|
  builder := UITheme builder.
  content := builder newColumn: {
        builder
                newListFor: self
                list: #contacts
                selected: #contactSelectedIndex
                changeSelected: #contactSelectedIndex:
                help: 'contacts'.
        builder newRow: {
                builder newButtonFor: self
                        action: #addButtonClick
                        label: 'Add'
                        help: 'Create a new contact'.
                builder newButtonFor: self
                        action: #removeButtonClick
                        getEnabled: #hasSelectedContact
                        label: 'Remove'
                        help: 'Remove selected contact'.
                builder newButtonFor: self
                        action: #editButtonClick
                        getEnabled: #hasSelectedContact
                        label: 'Edit'
                        help: 'Edit selected contact'  }}.

  (content openInWindowLabeled: 'Contacts') extent: 400@500.
When the Add button is clicked, message #addButtonClick is sent on the ContactListEditor object:
ContactListEditor>>addButtonClick
  |newContact|
  newContact := Contact new.

  ContactEditor new
        contact: newContact;
        onOK: [ Contact database add: newContact.
                selectedContactIndex := Contact database size.
                self
                        changed: #contacts;
                        changed: #hasSelectedContact];
        openModal.
ContactEditor defines a modal dialog to edit the firstName and lastName of a Contact:
ContactEditor>>openModal
  |builder dialog content firstName|

  builder := UITheme builder.
  content := (builder newLabelGroup: {
                'First name' -> (
                       firstName := (builder
                         newTextEntryFor: contact
                         getText: #firstName
                         setText: #firstName:
                         help: 'Enter the first name of the contact')
                       acceptOnCR: false;
                       minWidth: 200).
                'Last name' -> (
                       (builder
                          newTextEntryFor: contact
                          getText: #lastName
                          setText: #lastName:
                          help: 'Enter the last name of the contact')
                        acceptOnCR: false;
                        minWidth: 200) }).

  dialog := builder
              newPluggableDialogWindow:'Edit contact'
              for: content.
  dialog rememberKeyboardFocus: firstName.
  builder openModal: dialog.

  dialog cancelled ifFalse: [self doOnOK].
Disabling the acceptOnCR for each text frield allows the default dialog handling for the return key (defaults to OK).
Normally the initial keyboard focus for a dialog is the default button, if specified. Remembering the first name field prior to opening will give that field focus.
Now it should be easier to understand Polymorph examples found in
UITheme class>>exampleBasicControls and friends (in examples protocol).
Friday, January 14, 2011
PharoConf Annecy 2011
La première PharoConf Annecy aura lieu le jeudi 10 février à l'IMUS.
Site web de l'évènement: http://pharoconf-annecy.seasidehosting.st/
Les interventions seront plus tournées vers des coding-dojo et ateliers, développer du vrai code qui tourne :)
Deux points forts:
- Randori Test-Driven Development animé par Miguel Moquillon du Club Agile Rhône Alpes
- PharoSprint animé par Stéphane Ducasse
Entrée gratuite, mettez à jour vos agendas !
(Et merci de faire passer le message :)
Monday, January 10, 2011
Petite horloge
Morphic basics with a little Watch (Horloge in french).
Add the class:
One method called periodically thanks to stepping mechanism of Morphic:
Then evaluate in a Workspace:

Stop the watch:
Start it again:
Finally close it:
Add the class:
StringMorph subclass: #Horloge
 instanceVariableNames: ''
 classVariableNames: ''
 poolDictionaries: ''
 category: 'Sandbox'
One method called periodically thanks to stepping mechanism of Morphic:
Horloge>>step
 self contents: Time now printString.
Then evaluate in a Workspace:
Horloge new openInWorld.

Stop the watch:
Horloge allInstances last stopStepping
Start it again:
Horloge allInstances last startStepping
Finally close it:
Horloge allInstances last delete
Friday, June 18, 2010
Autotest for Pharo
I've started a new little project. Autotest is a live testing tool (similar to Ruby Autotest, but the Smalltalk way, more dynamic).
Autotest automatically runs tests related to the method you edit. Screencast to see it in action:
Autotest uses the following heuristics to find the tests to run:
- if the method is a test, runs it
- it the method is a test setUp or tearDown, run all the tests of the TestCase
- else find all senders which are tests in the same package and runs them (it detects different packages that are related, for example ProfStef-Core and ProfStef-Test)
To activate the Autotest dashboard:
- open the settings browser
- go under System
- check "Show Autotest Dashboard" option
To load it:
Gofer new
squeaksource: 'Autotest';
package: 'Autotest';
load
HelpSystem book included.
Tuesday, April 20, 2010
easy_squeakvm on github
I've created my first repository on github. So easy!
easy_squeakvm is used to build the squeak vm from scratch on Linux in one command.
To build the VM, just get the the script and execute
This will
I was tired of typing the same commands over and over :)
http://github.com/lolgzs/easy_squeakvm
easy_squeakvm is used to build the squeak vm from scratch on Linux in one command.
To build the VM, just get the the script and execute
./easy_squeakvm.sh
This will
- checkout squeakvm sources from svn repository
- download PharoCore image
- load VMMaker into PharoCore
- generate the interpreter
- build the VM
- put binaries in out/squeakvm, ready to use
I was tired of typing the same commands over and over :)
http://github.com/lolgzs/easy_squeakvm
Wednesday, March 10, 2010
How I build squeak vm on (Arch)Linux
I write this post as a memento for me. I will appreciate some feedback on building the VM on other Linux distro.
1. Prepare a working directory
All the work will take place in ~/squeakvm (/home/lol/squeakvm on my machine):
2. Get squeak-vm source
The easiest part. The VM source code tarball can be found on http://www.squeakvm.org/unix/. At the time of writing, the last stable version is 3.11-3.2135. Go and get it:
3. Load VMMaker tool
For more explanations on why VMMaker is needed and how it works, here is a good overview.
To generate the source code for your own VM, you need a running Pharo image. Here I use a fresh Pharo 1.0-10508 rc2 image from Pharo website.
Open your image, then load VMMaker by evaluating this in a Workspace:

4. Load FT2Plugin
UPDATE: Should not be necessary now. See Javier's comment.
To display anti-aliased font of Pharo images, you need the FT2Plugin. To load it:
5. Configure VMMaker and generate the VM source
Now you can open VMMakerTool:
In the Path to platforms field put the path to the extracted Squeak VM tarball: ~/squeakvm/Squeak-3.11.3.2135-src.
Then right-click on one of the plugins pane and select make all external for a simple configuration.
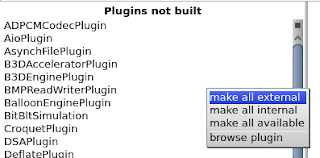
Note you can have a description of each plugin by reading the class comment.Classes are part of VMMaker-Plugins category.
In path to generated source select a directory where the VM source will be written. Here ~/squeakvm/src32.
The VMMakerTool window should look like this:
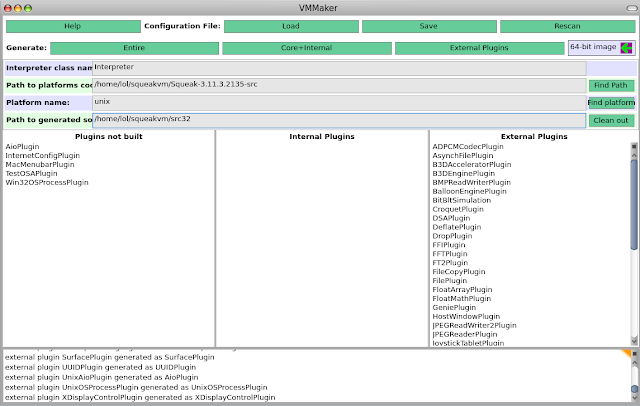
Then click on the Entire button (top-left of window). Wait a moment, pray, and the code should be generated.
Finally, I replace the original VM source with the generated one.
Note: theorically this should not be necessary as the configure script accepts an option to specify the source directory path, but it doesn't seem to work.
6. Build the VM
First create a directory for the build and go in:
Then run the configure script
First problem. I have this error:
Thanks to this mail there's a patch to correct it.
UPDATE: See Javier's comment.
Clean and run make again:
The process is not so easy. To help I put all the squeakvm directory (with sources, pharo image with vmmaker) on http://lolgzs.free.fr/pharo/squeakvm.tar.gz
UPDATE: Good post for MacOSX
1. Prepare a working directory
All the work will take place in ~/squeakvm (/home/lol/squeakvm on my machine):
mkdir ~/squeakvm
cd ~/squeakvm
2. Get squeak-vm source
The easiest part. The VM source code tarball can be found on http://www.squeakvm.org/unix/. At the time of writing, the last stable version is 3.11-3.2135. Go and get it:
wget http://www.squeakvm.org/unix/release/Squeak-3.11.3.2135-src.tar.gz
tar -xvzf Squeak-3.11.3.2135-src.tar.gz
3. Load VMMaker tool
For more explanations on why VMMaker is needed and how it works, here is a good overview.
To generate the source code for your own VM, you need a running Pharo image. Here I use a fresh Pharo 1.0-10508 rc2 image from Pharo website.
Open your image, then load VMMaker by evaluating this in a Workspace:
Gofer new
 squeaksource: 'MetacelloRepository';
 package: 'ConfigurationOfVMMaker';
 load.

(Smalltalk at:#ConfigurationOfVMMaker) project lastVersion load.

4. Load FT2Plugin
UPDATE: Should not be necessary now. See Javier's comment.
To display anti-aliased font of Pharo images, you need the FT2Plugin. To load it:
MCHttpRepository
 location:'http://www.squeaksource.com/FreeTypePlus'
 user: ''
 password: ''.

MCHttpRepository
 location: 'http://source.impara.de/freetype'
 user: ''
 password: ''.
5. Configure VMMaker and generate the VM source
Now you can open VMMakerTool:
VMMakerTool openInWorld
In the Path to platforms field put the path to the extracted Squeak VM tarball: ~/squeakvm/Squeak-3.11.3.2135-src.
Then right-click on one of the plugins pane and select make all external for a simple configuration.

Note you can have a description of each plugin by reading the class comment.Classes are part of VMMaker-Plugins category.
In path to generated source select a directory where the VM source will be written. Here ~/squeakvm/src32.
The VMMakerTool window should look like this:

Then click on the Entire button (top-left of window). Wait a moment, pray, and the code should be generated.
Finally, I replace the original VM source with the generated one.
rm -rf ~/squeakvm/Squeak-3.11.3.2135-src/unix/src
cp -a ~/squeakvm/src32 ~/squeakvm/Squeak-3.11.3.2135-src/unix/src
Note: theorically this should not be necessary as the configure script accepts an option to specify the source directory path, but it doesn't seem to work.
6. Build the VM
First create a directory for the build and go in:
mkdir ~/squeakvm/Squeak-3.11.3.2135-src/build
cd ~/squeakvm/Squeak-3.11.3.2135-src/build
Then run the configure script
../unix/cmake/configure
First problem. I have this error:
CMake Warning (dev) in
/home/lol/squeakvm/Squeak-3.11.3.2135-src/build/=/CMakeLists.txt:
  Syntax error in cmake code when parsing string

    ${=_link_directories}

  syntax error, unexpected cal_SYMBOL, expecting } (21)
Thanks to this mail there's a patch to correct it.
cd ~/squeakvm/Squeak-3.11.3.2135-src/unix/cmake/
wget http://lolgzs.free.fr/pharo/Plugins.cmake.patch
patch -p0 < Plugins.cmake.patch
Then clean and run the configure script again
cd ~/squeakvm/Squeak-3.11.3.2135-src/build
rm -rf *
../unix/cmake/configure
You should have the Makefile now. Run make:
makeThen another problem as libfreetype (needed by FT2Plugin) is not found. To correct it, create config.cmake for FT2Plugin this way:
mkdir ~/squeakvm/Squeak-3.11.3.2135-src/unix/plugins/FT2Plugin/
echo "PLUGIN_FIND_LIBRARY(FT2 freetype)" >
    ~/squeakvm/Squeak-3.11.3.2135-src/unix/plugins/FT2Plugin/config.cmake
More informations on this error here. UPDATE: See Javier's comment.
Clean and run make again:
make clean
make
Then install:
sudo make install7. Conclusion
The process is not so easy. To help I put all the squeakvm directory (with sources, pharo image with vmmaker) on http://lolgzs.free.fr/pharo/squeakvm.tar.gz
UPDATE: Good post for MacOSX
Saturday, January 30, 2010
Seaside-Hosting compatible Pharo
L'hébergeur gratuit (pour des applications non-commerciales) Seaside-Hosting accepte maintenant les images Pharo ! J'en ai donc profité pour déployer ma première image Seaside... et c'est d'une simplicité étonnante.
Il suffit juste de créer un compte, uploader son image, clicker sur Start et c'est fini. Cool.
J'ai donc mis en ligne une image avec SimpleWebDoc: http://magaloma.seasidehosting.st/
Il suffit juste de créer un compte, uploader son image, clicker sur Start et c'est fini. Cool.
J'ai donc mis en ligne une image avec SimpleWebDoc: http://magaloma.seasidehosting.st/
Subscribe to:
Posts (Atom)